Choose a Painting Idea by Its Main Technique
Browse fifty ideas in the expandable collections for pictures, patterns, printing, texture, and paintings used in play. The main article develops three complete starting projects: a window view, a sponge city, and a story map. Choose through the mark you want to make and the time available for setup, painting, drying, and cleanup. The instructions then show how to test a print, separate layers, vary a pattern, or make scenery that fits its intended game. Start with one technique and a suitable surface.
A: Choose by interest, materials, and time; the collections are a menu rather than a course.
A: Choose a single-layer picture or a few prints with a clear drying place and simple cleanup.
A: Test a thinner, more even paint coating and lift the leaf without sliding it.
A: Distinct foreground details may require the background to dry first.
A: Yes; arrangement, repetition, spacing, and color can be the complete subject.
A: Share a technique while letting each child choose the subject, scale, and arrangement.
A: Confirm fit, movement, suitable materials, and how the object will be handled.
A: Keep tools that contact art materials separate from food-use utensils.
A: Familiar techniques free attention for new compositions, color choices, or story details.
A: Invite the maker to select meaningful pieces or samples and discuss display, play, or storage together.
Begin With a Project That Matches the Session
Check the entire time window before choosing an activity. Setup, making, drying, and cleanup all need space. A single-layer brush picture may fit a short session, while a painted cardboard backdrop may need to dry before it can stand up. Tell the child what will be ready for use today. Clear expectations make waiting easier and help prevent a much-loved wet picture from being handled before the material can tolerate it.
Consider the kind of experience the child wants. Do they want to invent a scene, repeat an interesting mark, discover a mixture, or make an object for a game? Offer two distinct possibilities rather than reading fifty ideas aloud. A child who chooses printing might explore leaf impressions, while someone who wants a story might design a landscape for a character. The selected project should make that interest easier to pursue.
Set Up for the Actual Materials
Use age-appropriate paints as directed and provide surfaces that suit their moisture and thickness. Cover the work area with protection that genuinely handles the materials, not simply a thin decorative sheet. Set a stable water cup within reach without placing it directly under the drawing elbow. Keep a nearby place for finished wet work. Read the CPSC craft safety guidance when choosing supplies and tools. Household objects used as applicators should be clean, safe to handle, and suitable for the action; they should not return to food use after contact with art materials.
Choose the Size of the Project Deliberately
A large painting gives broad gestures room to develop, but it also needs a suitable work surface and drying space. A smaller sheet can make a first composition easier to finish, especially when the child wants to test a particular effect. Match the size to the action rather than assuming that bigger is always more exciting. A wide sponge impression needs generous room, while a study of three carefully observed leaves may work well on a modest sheet. Place the chosen tools on the paper briefly before painting to see whether the scale feels comfortable.
For a collaborative project, separate panels can make the process easier to manage. Each child can work within reach and later decide how the dry panels connect. Agree on one shared feature, such as a river passing between sheets, while leaving individual subjects open. Do not trim or repaint a child’s contribution without asking. The join between two different approaches can become part of the mural’s interest. If the pieces do not connect as imagined, display them together as related pictures and let the next project begin from what the group discovered.
Try Three Painting Projects With Clear Starting Steps
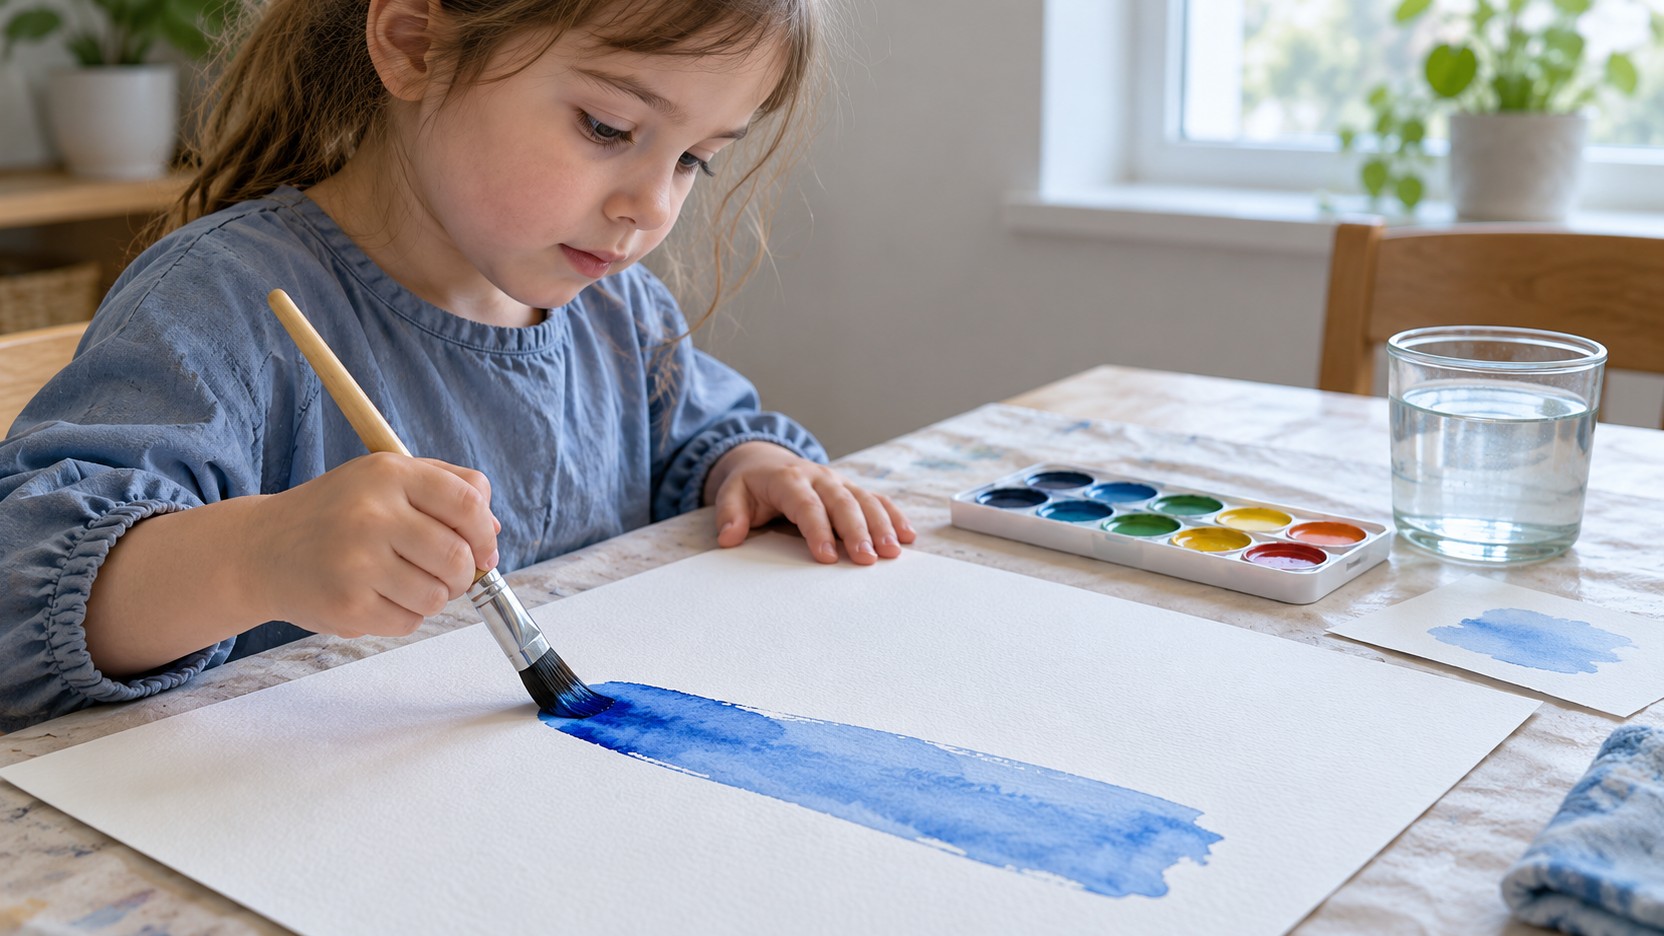
Window-view painting: gather paper, a broad brush, water as needed for the paint, and a small selection of colors. Look through a window and identify the three largest areas rather than every object. Paint those broad shapes first, leaving space where the main subject belongs. Let the surface dry if distinct later edges matter, then add one landmark that makes the view recognizable. A child can invent the weather or omit a building they do not want. This is a picture-making plan, not a requirement to copy the whole view accurately.
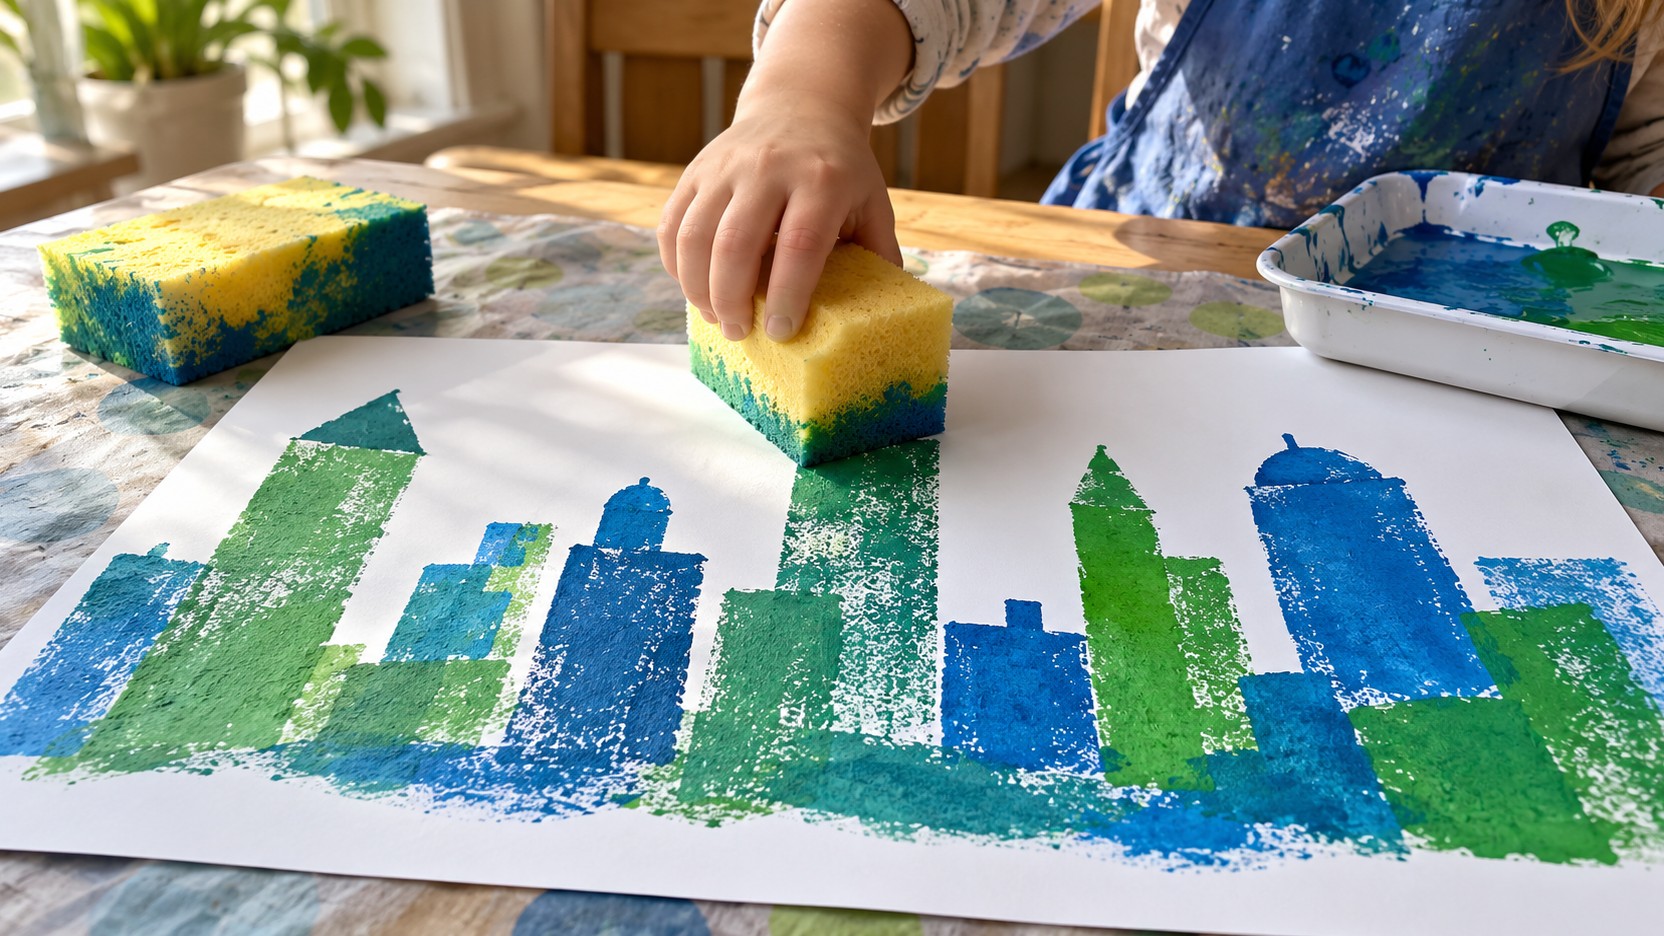
Sponge city: use a large clean suitable sponge, paper, and washable child-appropriate paint. An adult can prepare broad rectangular sponge pieces where needed. Test a lightly loaded surface on spare paper, press once, and lift straight up. Print several buildings with gaps between them, changing height by using a different broad shape or orientation. When the impressions are ready, add windows or a road with a brush. If the print floods, reduce the paint on the next trial; if it is faint, check contact and loading before pressing harder.
Story map: choose a large sheet, two brushes, suitable paint, and three imaginary destinations. Place those destinations with broad shapes before connecting them through a painted route. Let the first layer dry when the path needs a clear edge, then add one obstacle and another possible way around it. Try following the route with a paper character before adding decoration. A bridge may need widening or a landmark may need a stronger color. The map becomes useful when another player can understand where the story might go, even if its geography is completely invented.
Use the Fifty Ideas as a Curated Menu
The first collection emphasizes recognizable scenes and subjects. The second explores patterns and color arrangements. The third focuses on printing, while the fourth offers texture and layered surfaces. The fifth connects painting with stories, gifts, and play. Each idea has a distinct outcome or technique to investigate. Browse the category that matches today’s purpose rather than beginning at the top automatically.
Print With a Clear Contact Surface
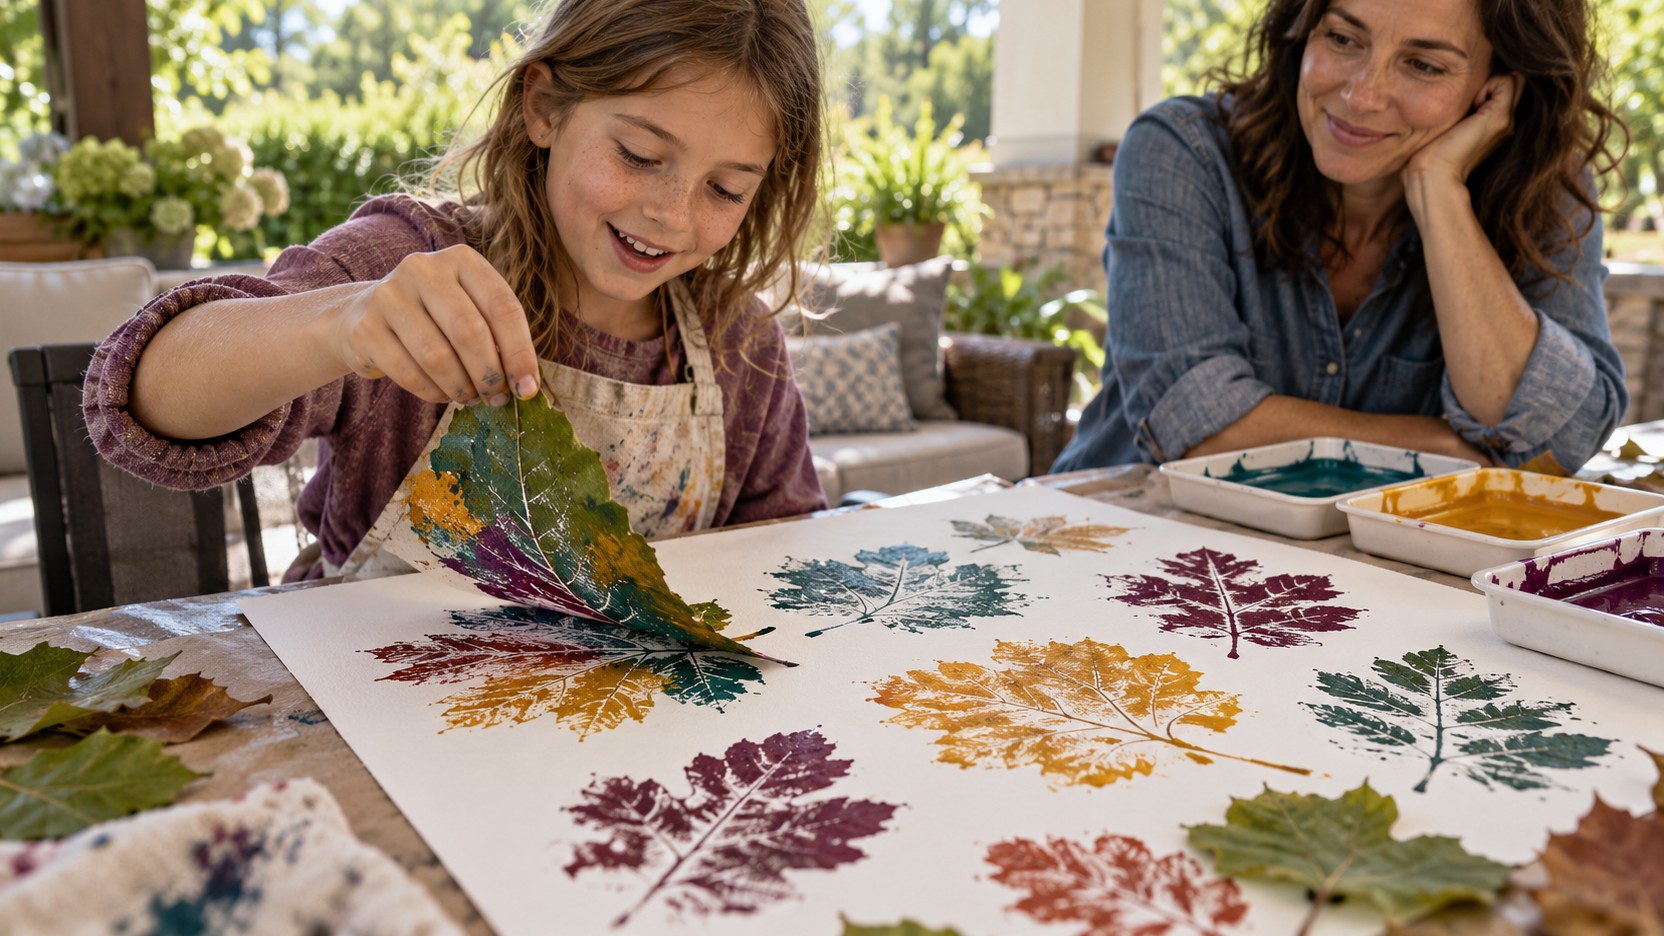
Printing works when paint transfers from an object onto a surface. Apply a thin, reasonably even coating to a suitable broad leaf, clean sponge, or adult-prepared card shape. Make a trial impression on spare paper. Too much paint may hide fine texture, while too little may leave only a faint broken mark. Let the child compare the trial with the applicator and decide what to adjust.
Lift the printing object carefully rather than sliding it if a clear impression is wanted. A deliberate slide can create another effect, so try it separately and compare. Keep the first composition simple enough that the child can see individual impressions. They might arrange repeated shapes into a border, overlap colors, or leave one print alone as a central subject. The technique offers structure while the arrangement remains a design choice.
Plan Layers Around What Needs to Stay Visible
For a story map, paint the broad ground areas first and decide whether the route needs a distinct edge. If it does, let that layer dry before adding the path. Test a small sample painted at the same time to see how another wet mark behaves before touching the main map. If the colors blend, wait longer or use the blended effect for an area such as mist or water. Keep a spare sheet for another small study during drying. When the map is ready, follow the route with the intended paper character and check that landmarks remain visible.
Make Patterns More Interesting Than Repeating One Stamp
A pattern can change through spacing, direction, color, or size. Begin with one repeated mark and alter a single feature along the row. The child might rotate each leaf impression a little farther or alternate a broad stroke with a narrow one. Keeping most features stable makes the change easier to see. A pattern study can become finished artwork without needing to turn into an animal or landscape.
Try arranging the same marks in two different compositions. A tightly packed cluster can feel different from a loose border around open space. Compare what attracts attention first and where the eye moves next. Avoid insisting that every pattern be perfectly regular. A deliberate interruption may become the most interesting part of the page. Ask whether the variation was wanted and what it does for the overall design.
Let Texture Suggest a Subject
Make three small texture samples: a lightly loaded brush pulled across the paper, a few soft dabs, and several curved sideways strokes. Compare them as possible rock, foliage, or water marks. Choose one sample and paint a larger area using the same movement, leaving space for a main subject. A broken grey patch might become a hillside behind a darker tree; curved blue marks might surround an unpainted island. Keep the trial beside the picture so the useful action can be repeated.
Keep texture in proportion to the picture. A very busy background can overwhelm a small quiet subject. The child can simplify a nearby area, enlarge the subject, or intentionally make the whole page a dense texture field. Each is a legitimate composition choice. Step back from the table briefly to see the relationship between areas rather than evaluating only the latest mark at close range.
When the tool creates an unexpected texture, pause long enough to notice it. A sponge with less paint may reveal more of its pores; a broad brush turned sideways may leave a sharper edge. Name the action so the child can try it again if desired. Recording the sample on a small scrap helps preserve the technique without requiring a long written explanation or an adult-designed worksheet.
Paint Something That Will Join a Game
Scenery, signs made with pictures, pretend menus, and character backgrounds give painting a purpose beyond display. Ask how the finished work will be handled. A stage backdrop needs to fit its frame; a game path should leave room for the pieces; a painted box may need a stable way to open. Test those practical relationships before covering the material. Choose paints and surfaces suitable for the planned use and keep the object away from mouths or food contact. Let all painted sections dry fully before assembling or playing with them.
Adapt the Same Project Without Assigning Identical Results
A shared painting invitation can support different choices. With leaf printing, one child may explore a few large overlapping impressions, another may create a symmetrical arrangement, and another may build a fictional forest from the marks. Offer materials and help according to need while leaving the picture’s purpose open. Large applicators, a stabilizing mat, or a partner holding the paper can make participation easier.
Do not assume that more detail or more steps always means a better challenge. A child who enjoys precision may work carefully with a simple composition, while someone exploring broad movement may want a large sheet and fewer colors. Ask what the maker wants to investigate next. The project can be adjusted through scale, complexity, timing, or tools without changing the underlying invitation for everyone else.
Finish With a Useful Record of What Happened
Before clearing the table, look at one feature the maker wants to remember. A sponge impression may have worked best with less paint, or a dry layer may have kept a path visible. Save a small technique sample if useful. The record should preserve a discovery rather than require an account of every decision.
Let the child choose a display, a safe drying place, or a role in play for the finished work. A story map can remain flat beside its characters, while a skyline may stand as scenery after an adult prepares a suitable support. Keep wet pieces separate until ready for handling. Agree on what will happen before moving or dismantling a valued picture.
Choose the next project through the technique the maker wants to use again. A clear sponge print might become another skyline or a border, while a layered route might lead to a different story map. Keep the supplies that served the effect and change the feature that did not. The next session can begin with a specific mark and a new use for it.